How to Change an Image Background with AI While Preserving the Subject
Use a real edit of a synthetic pouch image to see how to specify what must stay, inspect the result, and recognize when you need a protected subject layer.
You want a blue background instead of a gray one. You do not want a different zipper, a missing fabric loop, or a pouch that looks like a slightly different product. “Change the background” states the requested change but leaves the important checks implicit.
An AI image editor may keep the subject recognizable while changing its surface detail or color. Start by naming what must remain, save the original separately, and compare the actual output. If the original subject pixels must stay intact, use a workflow that protects them on a separate layer instead of relying only on a prompt.
Identify the details before editing
For this demonstration, we generated an unbranded, fictional canvas pouch, then submitted that generated image for a background edit using the built-in image-generation tool on September 7, 2026. It is a synthetic practice image, not a photograph of a real product. The results below are actual generated files from that edit, not mock before-and-after illustrations.
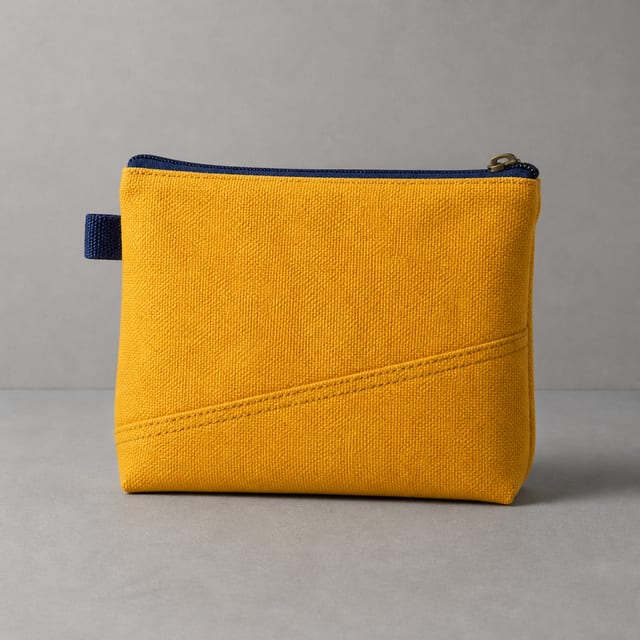
Before editing, identify the features that let you recognize this particular pouch:
- the brass zipper pull at the upper right;
- the navy loop projecting from the left;
- the diagonal double seam across the lower front;
- the mustard-colored fabric, its texture, and the pouch's outline.
For a real object, your list may include a logo, printed wording, a scratch, or a precise shape. Use an image you are entitled to edit. A general instruction to preserve “quality” does not identify these details.
Specify the change and the things that must stay
We used this edit request with the original image attached:
Replace only the gray wall and gray tabletop with a pale blue studio
background and matching pale blue surface. Keep the pouch's position,
size, mustard-yellow fabric, navy zipper, brass pull on the upper right,
navy loop on the left, and diagonal double seam unchanged. Keep the soft
light coming from the upper left. Do not add text, props, logos, or
decorations. Preserve the original square framing.
The request names the two background surfaces, the subject details, and the framing. It also keeps the requested scene simple: there is no new hand holding the pouch, no change of camera angle, and no dramatic new light source to reconcile.
That does not turn the prompt into a guarantee. It gives you a clear description against which to inspect the result.
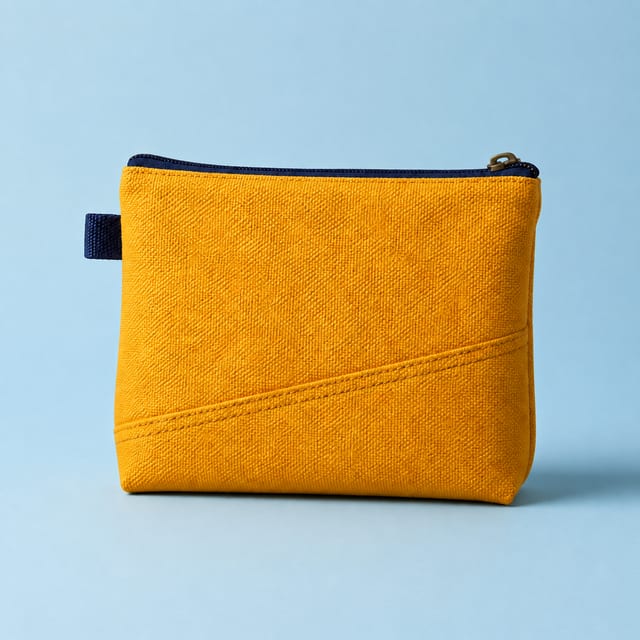
The output changed the background to blue. The pull, loop and diagonal seam remain recognizable in the corresponding places. Looking closely, however, the yellow fabric's appearance and fine texture differ. We would accept this as a demonstration of a background edit, but not as proof that the original product appearance was preserved exactly.
This one edit does not establish an error rate, a model ranking, or how the same image would behave in another app. The tool did not expose an exact model identifier, and we are not attributing the result to a named Photoshop or Gemini model.
Inspect the object, not just the new scene
Open the source and result at the same displayed size, then inspect at full resolution. Fit-to-screen viewing is good for composition but can hide small changes.
| Area | What to compare |
|---|---|
| Hardware and small attachments | Pull shape, loop presence, attachment points |
| Seams or printed details | Direction, number, spacing, missing marks |
| Outline | Corners, thickness, shape and clipping |
| Surface | Color appearance and altered fine texture |
| Contact with the background | Floating edges, halos, implausible shadows |
For this pouch, an absent loop would be a clear failure. A subtly different fabric texture may be acceptable for an illustrative concept but inappropriate for an accurate product listing. Decide that from the intended use, not from whether the generated image is attractive.
If you calculate a pixel difference, remember what it tells you: some pixels changed. It does not, by itself, distinguish a harmless lighting adjustment from a changed product feature. Inspect the feature that matters.
Choose a correction that fits the requirement
When one detail has drifted and approximate appearance is acceptable, return to the original image and make the correction specific. For example: “Keep the original left fabric loop visible and preserve the pouch outline. Change only the background.” Include the original again when the editor needs it; do not assume a fresh conversation retains the reference.
If exact subject preservation matters, a layered workflow gives you a different control: keep the original subject on its own layer and generate or replace the background behind it. Adobe documents a Generate Background workflow in Photoshop. Follow the current product instructions; we did not run that workflow for the images above.
A protected layer still needs a good mask—the boundary that separates subject from background. Inspect thin fabric loops, hair, glass and other difficult edges. A mask can remove a needed part, and any later color adjustment to the subject can still alter its appearance. Keeping the original layer available makes it possible to review or revert those changes.
For the final file, check the intended crop and export size as well as the subject. Save the edited version under a new name and retain the source. The edit is finished when the requested background is present and the details required for its actual use have survived your check.